In part 1, we looked at getting a wind controller plugged into the iPad to drive a synth (iSem) programmed for breath control. In this article, we’ll take it to the next level and integrate this synth into the rest of the iOS music ecosystem. The main goal is see how to record the synth output as part of a complete DAW project, but we’ll also look at some options for live performance. We’ll use the iSem synth and the Cubasis DAW as they support all three current protocols for integration: AudioBus(AB), Inter-App Audio (IAA), and Audio Units (AU). Let’s first look at the mechanics of each and then we’ll discuss some pros and cons of each.
1. Audiobus – AudioBus was released in Dec 2012 and it is difficult to overstate what a huge milestone this was in the history of iOS music making. This was the first technology that allowed for *live* audio to be passed between apps. Prior to this, the only way to share *recorded* audio between apps was AudioCopy. This still has its uses, but the workflow is tedious and extremely limited (though even that was way better than the days before AudioCopy). AudioBus opened up a whole new way of routing Inputs (mostly instrument apps) to Effects to Outputs (mostly DAWs). Any developer with more than two brain cells
saw the potential and there was an immediate clamor of apps to “get on the ‘bus”. Today, an iOS music app just can’t be taken very seriously until it supports AudioBus.
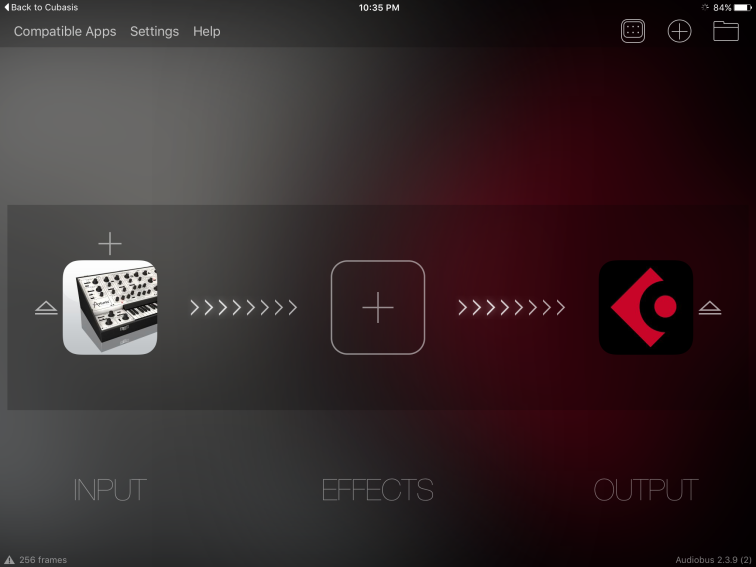
For our purposes here, the AB configuration couldn’t be simpler. Our synth, iSem, goes in the Input slot and our DAW, Cubasis, goes in the Output slot. Here’s how it looks in AudioBus:
And here’s how it looks in Cubasis.
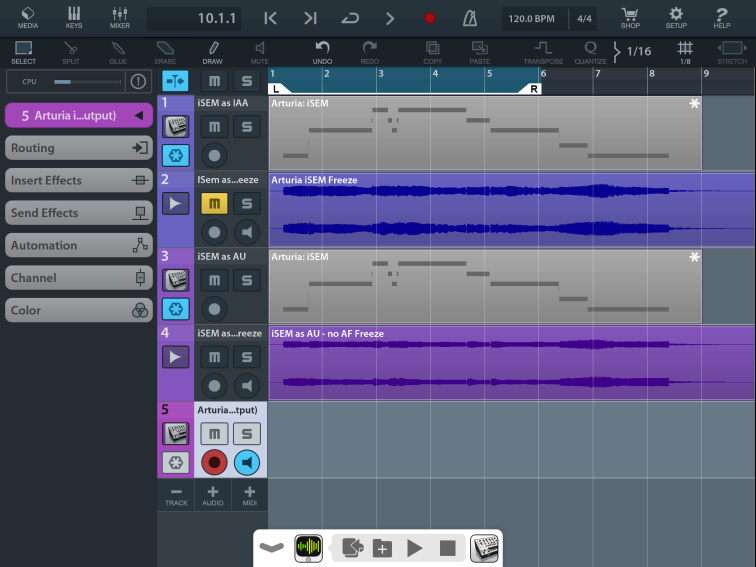
The full name of Track 5 is “Arturia iSEM (Main App Output)”. This was created automatically when the AB routing was created. Note that the track is armed for recording (the red and black circle) and live monitoring (the blue circle with speaker icon). MIDI is configured in iSem so when you play your EWI (WX5, whatever) the MIDI data goes to iSem just like it did in standalone mode, but the audio output goes first to Cubasis. This can be recorded to an audio track while the rest of the tracks in Cubasis are playing. This audio is also the starting point of the signal chain inside Cubasis, so even if it isn’t recorded, the synth output has access to all the features of Cubasis including insert effects (EQ, compression, amp sim, delay, chorus, etc.), mixer controls (volume, panning), and send effects before it goes to Cubasis’s output.
2. Inter-App Audio (IAA) – released with iOS 7 in September 2013, IAA was Apple’s answer to AudioBus. For the user at least, it offers a tighter integration between “Node” apps (instruments and effects) and “Host” apps (DAWs) with no visible connector app like AudioBus in the middle. Much has been written comparing the two, but for our purposes, we’re just going to dive in and do it. Here is how an IAA instrument track looks in Cubasis:

Track 1 is the IAA track. Note that it is a MIDI track and MIDI routing is handled in Cubasis, not the synth. When you tap the iSem icon, you switch to iSem and it looks like this:

It’s exactly the same view as the standalone app except for the Cubasis icon which goes back to the Host (more convenient than the iPad Home button at least) and the host transport controls so you can rewind and play/pause (and record but that’s not useful for our purposes here) from within the synth which is very handy for tweaking the synth patch without having to switch back to the host DAW.
Now the fact that this is a MIDI track has sone major ramifications. When you tap record, you are recording MIDI events, not audio as in the AudioBus scenario. Editing the MIDI clip later you can see the notes and the breath input recorded as Aftertouch controller events:
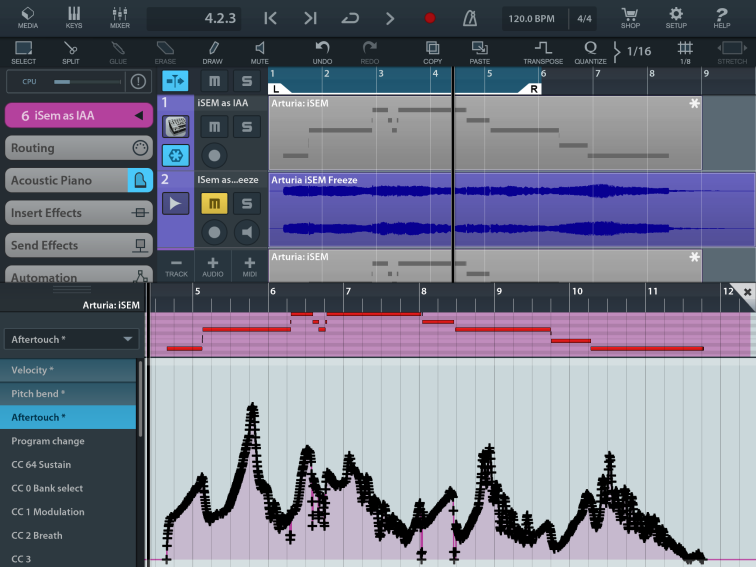
This means that the MIDI data can be edited later – extremely useful to fix a, ahem, “less than perfect” performance. For example, remove the little EWI glitch notes, move a note to the correct pitch, or extend a note that cut off too soon. (Hey, this is art – cheating is not only allowed, it’s encouraged! 😉 )
You can still get audio if you want by freezing the track, and you can see that in the above screenshots. Freezing works by feeding the recorded MIDI data back to the synth and recording the audio as a separate track (including any input effects on the MIDI track). This is kind of like a mini-AudioBus session all within Cubasis, but again you aren’t necessarily limited to what came out of your mouth the first time.
3. Audio Units (AU) – the Audio Units protocol was released with iOS 9 in September 2015. Somewhat similar in purpose to IAA, AU promises even tighter integration with host apps, but the adoption rate from app developers has been much slower than for AB or IAA. But if the synth or effect you want to use supports it, why not use it? Here is how an AU instrument track looks in Cubasis:

Track 3 is the AU track. When you tap the iSem icon, a smaller iSem panel comes up right in Cubasis: it doesn’t completely switch over to iSem like it does in IAA mode. Like IAA, the track is a MIDI track with all the benefits listed above.
A big selling point of the AU protocol is that you can have multiple instances of an AU app within the host. With AB and IAA, you are limited to a single instance. This is more important for effects apps where you often want separate instances on different tracks. It is a bit less important with instruments since the track freeze feature can be used to work around this limitation, but there are some truly impressive (by current iOS standards) examples of projects running 10 or 20 instances of the same synth app in the same project, live.
HOWEVER, for purposes of using iSem as a breath controlled synth, AU is ABSOLUTELY USELESS – for one very important reason. The Aftertouch data is not passed from Cubasis to iSem! I have not determined if this is a bug in Cubasis, iSem, or the AU protocol itself. Whatever it is, it isn’t working for me at this time. So that’s the end of that exploration at the moment. Of course, iSem and AU may still prove useful for non-breath patches (pads, keys, percussion, fx, etc.), but for EWI work, I’ll have to stick to IAA.
So which to use? At this point, I see no reason not to use IAA. It provides MIDI edit-ability, tighter integration than AudioBus, and unlike AU, works with Aftertouch. AB might still be useful if there is a non-IAA effect desired, but in that case, a slightly more complicated signal path could be used with the IAA Cubasis track as input, the effect app in the middle slot, and output to a separate Cubasis track for recording.
So that’s it. I think I’ve said it recently in these pages, but Cubasis and IAA are opening a lot of avenues for me in terms of the number and kinds of apps I am able to effectively use in my production process. The fact that several of these apps can even be augmented for breath control is a big added bonus.
P.s. Finally, I’ll end with a few resources for further reading discovered while writing this article:

One thought on “Programming iPad Synths for Breath Control, Part 2”